

Imuflex WB-RP Blood Bag System
Generic name: anticoagulant citrate phosphate dextrose (cpd) and optisol as-5 red cell preservative
Dosage form: blood bag
Revised 2015-12 N-WR-OP-A-DB 2
CPD/OPTISOL® SOLUTION
For the collection of 500 mL of Whole Blood
FULL PRESCRIBING INFORMATION
*Sections or subsections omitted from the Full Prescribing Information are not listed [includes sections 4, 6, 7, 8, 9, 10, 12, 13, 14, 15 and 17].
On This Page
1. INDICATIONS AND USAGE
1.1. Read these instructions carefully before use.
1.2. Rx ONLY.
1.3. Intended for the collection, processing and preservation of Whole Blood and blood components. Not intended for direct intravenous infusion.
1.4. For the collection of 500 mL ±10% Whole Blood.
1.5. Integral Diversion Blood Sampling Arm is intended to divert and obtain donor samples for laboratory testing prior to collection of the Whole Blood unit.
1.6. Integral filter unit intended for leukocyte reduction of Whole Blood up to 8 hours after blood collection when Whole Blood is stored at ambient temperature or cooled towards 1-10°C (transport temperature).
1.7. For further processing, use standard component processing techniques.
2. DOSAGE AND ADMINISTRATION
2.1. To open blister package, peel cover film back 4/5 of its length.
2.2. Prepare the blood bag following your institution's standard operating procedures.
2.2.1. Materials Needed:
- VENOJECT®@Tube Holder (code P-1316R) or equivalent
- VENOJECT@Multi-Sample Luer Adapter (code MN*2000T) or equivalent
- Evacuated blood collection tubes (glass or plastic)
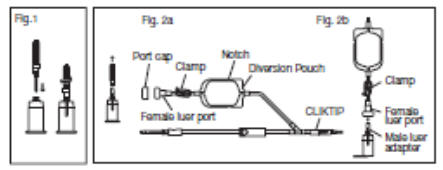
2.3. Make a loose knot in the donor tubing below the "Y" and CLIKTIP® (inline closure device) unless alternate methods are used to seal the tubing at the end of collection.
2.4. Temporarily clamp donor tubing between the phlebotomy needle and the "Y".
2.5. Close the White Clamp below the diversion pouch.
2.6. Assemble the luer adapter and the tube holder.
2.6.1. Connect the VENOJECT@Multi-Sample Luer Adapter to the VENOJECT@Tube Holder (or equivalent) (Fig. 1).
2.6.2. Twist and snap to remove the blue port cap at the end of the Diversion Blood Sampling Arm (Fig. 2a).
2.6.3. Insert the Holder/Luer assembly in the female luer port (Fig. 2b).
2.6.4. NOTE: Alternatively, steps 2.6.1., 2.6.2., and 2.6.3. (above) may be performed at any time during bag preparation or after the blood is collected into the diversion pouch.
2.7. Suspend the collection bag as far as possible below the donor's arm.
2.8. Apply blood pressure cuff or tourniquet to donor's arm. Disinfect site of phlebotomy. If blood pressure cuff is used, inflate to approximately 60 mmHg.
2.9. Remove the needle cover and perform phlebotomy. Remove the temporary clamp on the donor tubing to permit blood flow into the Diversion Blood Sampling Arm pouch.
2.9.1. CAUTION: Do not touch the needle after removing the needle cover.
2.9.2. CAUTION: Assure that the White Clamp b...